
BOOK 2 - 스프링부트와 AWS로 혼자 구현하는 웹 서비스(4)
스프링부트와 AWS로 혼자 구현하는 웹 서비스 - 4
Spring Security와 OAuth2로 구글 로그인 기능 구현
Google Oauth2 설정
- 많은 서비스에서 자체 로그인 기능을 구현하기보다 구글, 페이스북, 네이버 로그인 같은 소셜 로그인 기능을 사용한다.
- 직접 로그인 기능을 구현할 경우
본인 인증,로그인 보안,비밀번호 찾기,비밀번호 변경등의 기능들을 모두 구현해야 하는 복잡함이 있다. - Oauth2를 사용하여 로그인 기능 구현시 위 기능들을 따로 구현할 필요가 없어 서비스 개발에 집중할 수 있다.
- 직접 로그인 기능을 구현할 경우
Oauth2 client 생성
-
Oauth2 클라이언트는 https://console.cloud.google.com 에서 프로젝트 생성 후 생성할 수 있다.
-
사용자에게 보여질 ‘OAuth 동의 화면’ 을 구성한 뒤 ‘승인된 리디렉션 URI’ 값을 설정해준다.
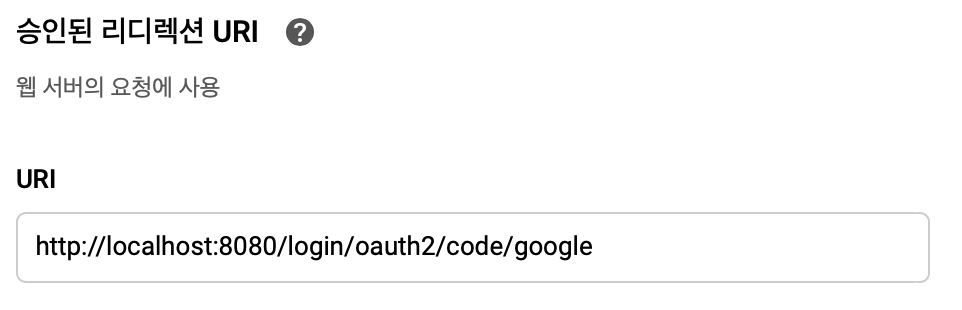
- 서비스에서 파라미터로 인증 정보를 주었을 때 인증이 성공하면 구글에서 redirect할 URL 정보
- 스프링 부트2 버전의 시큐리티에서는 기본적으로
{domain}/login/oauth2/code/{소셜서비스코드}로 redirect URL을 지원하고 있다. - Spring Security에서 이미 해당 URL을 지원하는 Controller를 구현해놓은 상태이기 때문에 사용자가 별도로 Controller를 구현할 필요 없다.
-
프로젝트에 oauth2 client 정보 설정
-
application-oauth.properties생성spring.security.oauth2.client.registration.google.client-id=클라이언트 ID spring.security.oauth2.client.registration.google.client-secret=클라이언트 보안 비밀 spring.security.oauth2.client.registration.google.scope=profile,email- 스프링부트에서는 properties의 이름을
application-xxx.properties로 만들면xxx라는 이름의 profile이 생성되어 이를 통해 관리할 수 있다.- 즉, profile마다 해당 properties의 설정들을 가져올 수 있다.
- 스프링부트에서는 properties의 이름을
-
application.properties에 profile 설정 추가spring.profiles.include=oauth -
oauth 클라이언트 정보(클라이언트 ID, 클라이언트 보안 비밀)는 외부에 노출되면 안되는 중요 정보이기 때문에 공개적인 github remote repository에 올라가서는 안된다.
-
.gitignore파일에application-oauth.properties파일을 제외시키는 설정을 추가해준다.application-oauth.properties
-
프로젝트에 User Entity 생성 및 Spring-Security 설정
User 클래스
@Getter
@NoArgsConstructor
@Entity
public class User extends BaseEntity {

    @Id
    @GeneratedValue(strategy = GenerationType.IDENTITY)
    private Long id;

    @Column(nullable = false)
    private String name;

    @Column(nullable = false)
    private String email;

    @Column
    private String picture;

    @Enumerated(EnumType.STRING)
    @Column(nullable = false)
    private Role role;

    @Builder
    public User(String name, String email, String picture, Role role) {
        this.name = name;
        this.email = email;
        this.picture = picture;
        this.role = role;
    }

    public User update(String name, String picture) {
        this.name = name;
        this.picture = picture;
        return this;
    }

    public String getRoleKey() {
        return this.role.getKey();
    }
}
@Enumerated(EnumType.STRING)- JPA로 DB에 데이터를 저장할 때 Enum 값을 어떤 형태로 저장할지 설정
- 별도 설정해주지 않으면 기본적으로 int형 숫자가 저장된다.
Role 클래스
@Getter
@RequiredArgsConstructor
public enum Role {
    GUEST("ROLE_GUEST", "손님"),
    USER("ROLE_USER", "일반 사용자");

    private final String key;
    private final String title;
}
- Spring Security에서는 권한 코드에 항상
ROLE_이 앞에 들어가야만 한다.
UserRepository 인터페이스
public interface UserRepository extends JpaRepository<User, Long> {

    Optional<User> findByEmail(String email);
}
findByEmail: 소셜 로그인으로 반환되는 값 중 email을 통해 이미 생성된 사용자인지 판단하기 위해 user를 조회하는 메서드
spring-security dependency 설정
-
build.gradle에 dependency 추가compile('org.springframework.boot:spring-boot-starter-oauth2-client')
SecurityConfig 클래스
@RequiredArgsConstructor
@EnableWebSecurity
public class SecurityConfig extends WebSecurityConfigurerAdapter {

    private final CustomOAuth2UserService customOAuth2UserService;

    @Override
    protected void configure(HttpSecurity http) throws Exception {
        http.csrf().disable()
            .headers().frameOptions().disable()
            .and()
            .authorizeRequests()
            .antMatchers("/", "/images").permitAll()
            .antMatchers("/api/v1/**").hasRole(Role.USER.name())
            .anyRequest().authenticated()
            .and()
            .logout().logoutSuccessUrl("/")
            .and()
            .oauth2Login().userInfoEndpoint().userService(customOAuth2UserService);
    }
}
@EnableWebSecurity: Spring Security 설정을 활성화 시킨다.csrf().disable().headers().frameOptions().disable(): h2-console 화면을 사용하기 위해 해당 옵션들을 disable 설정authorizeRequests- URL 별 권한 관리를 설정하는 옵션의 시작점
antMatchers옵션을 사용하기 위해서 선언
antMatchers- URL, HTTP 메서드별로 권한 관리 대상을 지정하는 옵션
"/"등의 로그인이 필요없는 URL들은permitAll()옵션을 통해 전체 열람 권한을 준다."/api/v1/**"주소를 가진 API는USER권한을 가진 사용자만 접근 가능하도록 한다.
anyRequest- 설정된 값들 이외 나머지 URL들을 나타낸다.
authenticated()옵션을 추가하여 나머지 URL들은 모두 인증된 사용자만 접근 가능하도록 한다.
logout().logoutSuccessUrl("/")- 로그아웃 기능에 대한 여러 설정의 진입점
- 로그아웃 성공시
"/"주소로 이동한다.
oauth2Login: OAuth2 로그인 기능에 대한 여러 설정의 진입점userInfoEndpoint: OAuth2 로그인 성공 이후 사용자 정보를 가져올 때의 설정의 진입점userService- OAuth2 로그인 성공 이후 후속 조치를 진행할
UserServiceinterface의 구현체를 등록한다. - 소셜 서비스에서 사용자 정보를 가져온 상태에서 추가로 진행하고자 하는 기능을 명시할 수 있다.
- OAuth2 로그인 성공 이후 후속 조치를 진행할
OAuth2Service를 사용한 로그인 기능 구현
CustomOAuth2UserService
@RequiredArgsConstructor
@Service
public class CustomOAuth2UserService implements OAuth2UserService<OAuth2UserRequest, OAuth2User> {

    private final UserRepository userRepository;
    private final HttpSession httpSession;

    @Override
    public OAuth2User loadUser(OAuth2UserRequest userRequest) throws OAuth2AuthenticationException {
        OAuth2UserService delegate = new DefaultOAuth2UserService();
        OAuth2User oAuth2User = delegate.loadUser(userRequest);

        String registrationId = userRequest.getClientRegistration().getRegistrationId();
        String userNameAttributionName = userRequest.getClientRegistration().getProviderDetails()
          .getUserInfoEndpoint().getUserNameAttributeName();

        OAuthAttributes attributes = OAuthAttributes.of(registrationId, userNameAttributionName, oAuth2User.getAttributes());

        User user = saveOrUpdate(attributes);
        httpSession.setAttribute("user", new SessionUser(user));

        return new DefaultOAuth2User(Collections.singleton(new SimpleGrantedAuthority(user.getRoleKey())),
                                     attributes.getAttributes(),
                                     attributes.getNameAttributeKey());
    }

    private User saveOrUpdate(OAuthAttributes attributes) {
        User user = userRepository.findByEmail(attributes.getEmail())
          .map(entity -> entity.update(attributes.getName(), attributes.getPicture()))
          .orElse(attributes.toEntity());

        return userRepository.save(user);
    }
}
registrationId- 현재 소셜 로그인 진행 중인 서비스를 구분하는 코드
- 하나의 소셜 로그인만 사용시에는 불필요한 값이지만, 이후 네이버나 페이스북 등 다양한 확장을 고려했을 때 서비스를 구분하기 위해 사용한다.
userNameAttributeName- OAuth2 로그인 진행 시 키가 되는 필드값 (Primary Key와 같은 의미)
- 이후 네이버 로그인과 구글 로그인을 동시 지원할 때 사용된다.
OAuthAttributesDefaultOAuth2UserService를 통해 가져온 OAuth2User의 attribute를 담을 클래스- 다른 소셜 로그인들과 공용으로 사용한다.
SessionUser- session에 사용자 정보를 저장하기 위한 DTO 클래스
- User Entity 클래스와 별도로 생성하여 사용한다.
saveOrUpdate()- 소셜 사용자 정보가 업데이트 되었을 때를 대비하여 update 기능을 추가한다.
- 기존 소셜 사용자 정보가 서비스 DB에 없으면 소셜 사용자 정보를 User Entity로 변환 후 save 한다.
OAuthAttributes DTO 클래스
@Getter
public class OAuthAttributes {

    private Map<String, Object> attributes;
    private String nameAttributeKey;
    private String name;
    private String email;
    private String picture;

    @Builder
    public OAuthAttributes(Map<String, Object> attributes,
                           String nameAttributeKey,
                           String name,
                           String email,
                           String picture) {
        this.attributes = attributes;
        this.nameAttributeKey = nameAttributeKey;
        this.name = name;
        this.email = email;
        this.picture = picture;
    }

    public static OAuthAttributes of(String registrationId, String userNameAttributeName,
                                     Map<String, Object> attributes) {
        return ofGoogle(userNameAttributeName, attributes);
    }

    private static OAuthAttributes ofGoogle(String userNameAttributeName,
                                            Map<String, Object> attributes) {
        return OAuthAttributes.builder()
          .name((String)attributes.get("name"))
          .email((String)attributes.get("email"))
          .picture((String)attributes.get("picture"))
          .attributes(attributes)
          .nameAttributeKey(userNameAttributeName)
          .build();
    }

    public User toEntity() {
        return User.builder()
          .name(name)
          .email(email)
          .picture(picture)
          .role(Role.GUEST)
          .build();
    }
}
toEntity()OAuthAttributes에서 User Entity를 생성하는 시점은 처음 가입할 때이다.- 가입할 때 기본 권한을
GUEST로 주기 위해서role빌더 값에Role.GUEST값을 설정해준다.
SessionUser DTO 클래스
@Getter
public class SessionUser implements Serializable {

    private String name;
    private String email;
    private String picture;

    public SessionUser(User user) {
        this.name = user.getName();
        this.email = user.getEmail();
        this.picture = user.getPicture();
    }
}
SessionUser에는 인증된 사용자 정보만 필요하다.
User Entity 클래스와 SessionUser DTO 클래스를 분리해서 사용하는 이유
-
User 클래스를 그대로 세션에 저장하도록 했을 경우 다음과 같은 에러가 발생한다.
Failed to convert from type [java.lang.Object] to type [byte[]] for value '...User'- User 클래스에
Serializable을 구현하지 않았다는 의미의 에러이다.
- User 클래스에
-
Entity 클래스는 다른 엔티티와 관계가 형성될 여지가 있다.
@OneToMany,@ManyToMany등 자식 엔티티를 갖고 있으면 직렬화 대상에 자식 엔티티들까지 모두 포함되어 성능 이슈, 부수 효과가 발생할 수 있다.
-
Serializableinterface를 구현한 session DTO를 하나 추가로 만드는 것이 운영 및 유지보수에 좋다.
OAuth2 로그인 기능 구현 개선
Annotation 기반 SessionUser 설정
LoginUser Annotation 클래스
@Target(ElementType.PARAMETER)
@Retention(RetentionPolicy.RUNTIME)
public @interface LoginUser {

}
@Target(ElementType.PARAMETER)- 해당 annotation이 생성될 수 있는 위치 지정
PARAMETER: 메서드의 파라미터로 선언된 객체에서만 사용할 수 있다.
@interface- 해당 클래스를 Annotation 클래스로 지정
- 즉,
LoginUser라는 이름을 가진 어노테이션이 생성되었다는 의미이다.
LoginUserArgumentResolver 클래스
@RequiredArgsConstructor
@Component
public class LoginUserArgumentResolver implements HandlerMethodArgumentResolver {

    private final HttpSession httpSession;

    @Override
    public boolean supportsParameter(MethodParameter parameter) {
        boolean isLoginUserAnnotation = parameter.getParameterAnnotation(LoginUser.class) != null;
        boolean isUserClass = SessionUser.class.equals(parameter.getParameterType());
        return isLoginUserAnnotation && isUserClass;
    }

    @Override
    public Object resolveArgument(MethodParameter parameter, ModelAndViewContainer mavContainer,
                                  NativeWebRequest webRequest, WebDataBinderFactory binderFactory) throws Exception {
        return httpSession.getAttribute("user");
    }
}
HandlerMethodArgumentResolver: 조건에 맞는 경우 해당 인터페이스의 구현체가 지정한 값으로 해당 메서드의 parameter로 넘길 수 있다.supportsParameter()- 컨트롤러 메서드의 특정 parameter를 지원하는지 판단한다.
@LoginUserannotation이 붙어 있고, 클래스 타입이SessionUser.class인 경우 true를 반환한다.
resolveArgument(): parameter에 전달할 객체를 생성한다.
WebConfig Configuration 클래스
@RequiredArgsConstructor
@Configuration
public class WebConfig implements WebMvcConfigurer {
    private final LoginUserArgumentResolver loginUserArgumentResolver;

    @Override
    public void addArgumentResolvers(List<HandlerMethodArgumentResolver> resolvers) {
        resolvers.add(loginUserArgumentResolver);
    }
}
LoginUserArgumentResolver를 스프링에서 인식될 수 있도록WebMvcConfigurer를 구현한 구현체에 추가한다.
Session 저장소를 DB로 변경
- 지금까지의 구현은 appllication을 재실행하면 사용자 로그인이 해제된다.
- session이 내장 톰캣의 메모리에 저장되기 때문이다.
- 따라서 application 실행 시 실행되는 내장 톰캣 같은 경우 세션이 항상 초기화된다.
-
또한, 2대 이상의 서버에서 서비스하고 있다면 톰캣마다 세션 동기화 설정을 해야 한다.
- 문제점을 해결하기 위한 두가지 방식이 있다.
- MySQL과 같은 DB를 세션 저장소로 사용
- 여러 AWS 간의 공용 세션을 사용할 수 있는 가장 쉽고 간단한 방법
- 로그인 요청마다 DB I/O가 발생하여 성능 이슈가 발생할 수 있다는 단점이 있다.
- 로그인 요청이 많이 없는 서비스에서 간단하게 사용하기 좋다.
- Redis, Memcached와 같은 메모리 DB를 세션 저장소로 사용
- 실제 B2C 서비스에서 가장 많이 사용하는 방식
- MySQL과 같은 DB를 세션 저장소로 사용
spring-session-jdbc dependency 추가
-
build.gradle에 dependency 추가compile('org.springframework.session:spring-session-jdbc') -
application.properties에 세션 저장소 설정 추가spring.session.store-type=jdbc -
JPA로 인해 session table이 DB에 자동 생성된다.
네이버 로그인 기능 구현
Naver Oauth2 설정
Oauth2 client 생성
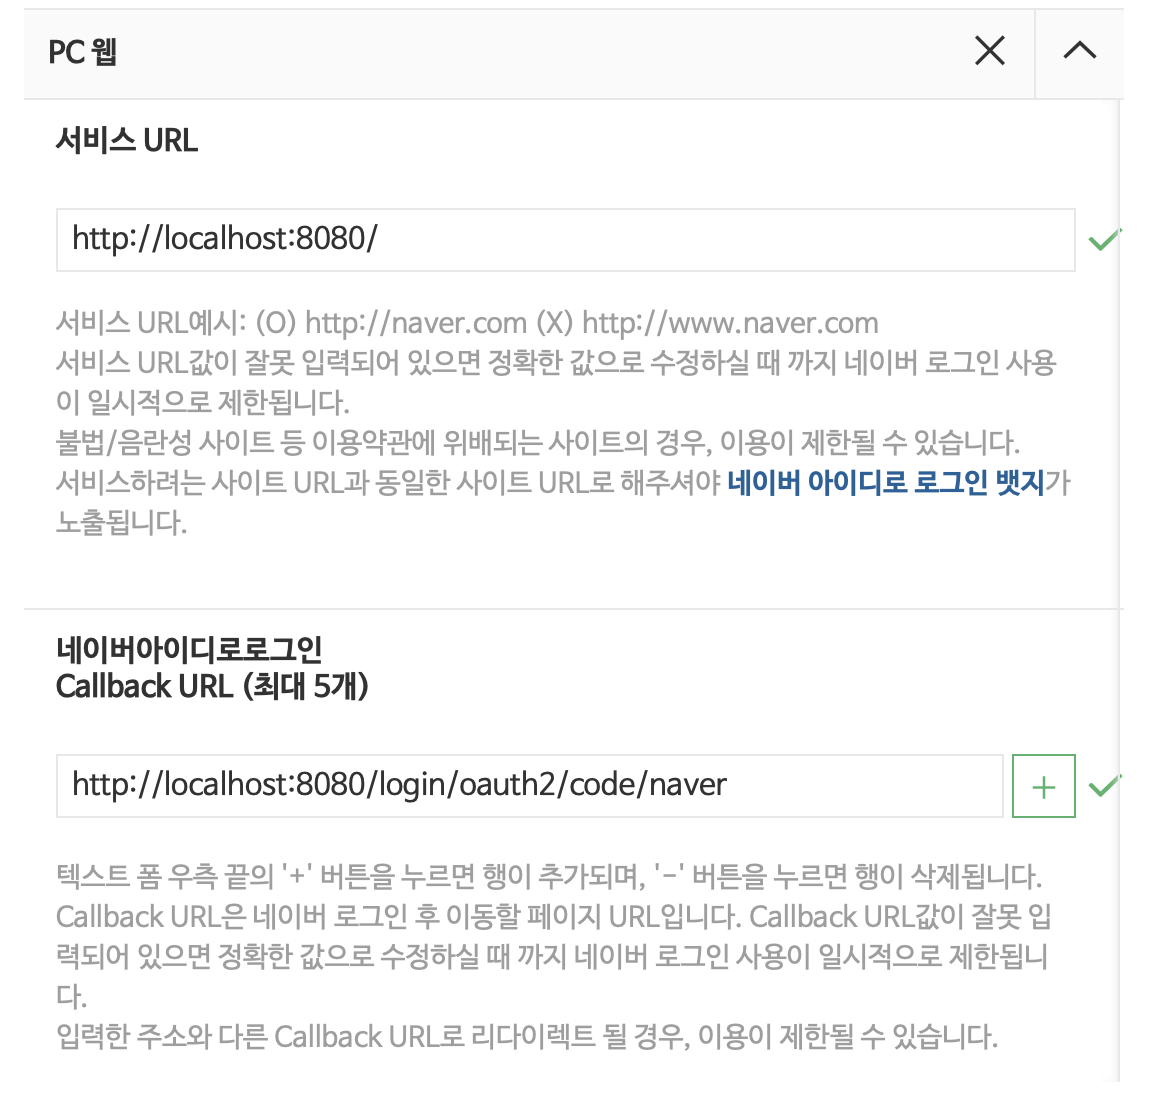
- https://developers.naver.com/apps/#/register 에서 application 등록 후 서비스 URL, Callback URL 설정
프로젝트에 oauth2 client 정보 설정
-
application-oauth.properties파일에 네이버 클라이언트 정보 설정 -
네이버에서는 spring-security를 공식 지원하지 않기 때문에 provider 값들도 전부 수동으로 입력해야 한다.
# naver registration spring.security.oauth2.client.registration.naver.client-id=클라이언트 ID spring.security.oauth2.client.registration.naver.client-secret=클라이언트 비밀 spring.security.oauth2.client.registration.naver.redirect-uri={baseUrl}/{action}/oauth2/code/{registrationId} spring.security.oauth2.client.registration.naver.authorization-grant-type=authorization_code spring.security.oauth2.client.registration.naver.scope=name,email,profile_image spring.security.oauth2.client.registration.naver.client-name=Naver # naver provider spring.security.oauth2.client.provider.naver.authorization-uri=https://nid.naver.com/oauth2.0/authorize spring.security.oauth2.client.provider.naver.token-uri=https://nid.naver.com/oauth2.0/token spring.security.oauth2.client.provider.naver.user-info-uri=https://openapi.naver.com/v1/nid/me spring.security.oauth2.client.provider.naver.user-name-attribute=response- 네이버에서는
userNameAttributeName이response가 된다.- spring-security에서는 최상위 필드만
user_name으로 지정 가능하다. - 네이버 회원 조회시 반환되는 JSON 데이터에서 최상위 필드는
resultCode,message,response이고, 이 중 사용자 정보를 담고 있는 필드인response를user_name으로 지정한다.
- spring-security에서는 최상위 필드만
- 네이버에서는
Spring-Security 설정
- 구글 로그인 기능 구현에서 코드를 확장성 있게 구현했기 때문에 네이버 로그인을 추가할 때는
OAuthAttributes클래스에서registrationId값으로 네이버인지 판단해서 데이터 생성하는 부분만 추가해주면 된다.
OAuthAttributes 클래스
public class OAuthAttributes {
  ...

  private static final String NAVER = "naver";

  public static OAuthAttributes of(String registrationId, String userNameAttributeName,
                                   Map<String, Object> attributes) {
      if(NAVER.equals(registrationId)) {
          return ofNaver("id", attributes);
      }
      return ofGoogle(userNameAttributeName, attributes);
  }

  private static OAuthAttributes ofNaver(String userNameAttributeName, Map<String, Object> attributes) {
      Map<String, Object> response = (Map<String, Object>) attributes.get("response");

      return OAuthAttributes.builder()
        .name((String)response.get("name"))
        .email((String)response.get("email"))
        .picture((String)response.get("profile_image"))
        .attributes(response)
        .nameAttributeKey(userNameAttributeName)
        .build();
  }
}
기존 Test Code에 Spring-Security 적용
- 기존의 API Test code들이 모두 인증에 대한 권한을 받지 못하였으므로 테스트 코드마다 인증한 사용자가 호출한 것처럼 수정해야 한다.
test 환경의 설정 파일 생성
src/main환경과src/test환경은 본인만의 환경 구성을 가진다.- 그러나
test환경에서application.properties파일이 없는 경우main환경의 설정을 그대로 가져오게 된다. - 다만, 자동으로 가져오는 설정의 범위는
application.properties파일까지이며,application-oauth.properties파일은 가져오지 않기 때문에 소셜 로그인 관련 설정값들이 존재하지 않는 문제가 발생한다.
- 그러나
src/test밑에 테스트 환경을 위한application.properties파일을 생성하여 가짜 oauth 설정값을 등록한다.
application.properties 파일
spring.jpa.show-sql=true
spring.session.store-type=jdbc

# Test OAuth
spring.security.oauth2.client.registration.google.client-id=test
spring.security.oauth2.client.registration.google.client-secret=test
spring.security.oauth2.client.registration.google.scope=profile,email
API Test Code에 인증된 사용자 추가
ReviewControllerTest의 테스트 코드를 실행하면 응답 결과로302 FOUND가 나와서 테스트가 실패한다.- 이는 Spring-Security 설정으로 인증되지 않은 사용자의 요청은 redirect 시키기 때문이다.
- 인증이 필요한 API의 테스트 코드에는 임의로 인증된 사용자를 추가하여 테스트할 수 있도록 한다.
spring-security-test dependency 추가
-
build.gradle에서 spring-security-test dependency를 추가한다.testCompile('org.springframework.security:spring-security-test')
ReviewControllerTest
test method에 임의 사용자 인증 추가
@Test
@WithMockUser(roles = "USER")
public void save_review() throws Exception {
  ...
}
@WithMockUser(roles = "USER")- 인증된 mock user를 만들어서 사용한다.
ROLE_USER권한을 가진 사용자가 API를 요청하는 것과 동일한 효과
MockMvc 사용하여 API 호출
@WithMockUserannotation은MockMvc에서만 작동하기 때문에@SpringBootTest로만 사용하는 현재 코드에서는 작동하지 않는다.- 기존
TestRestTemplate대신MockMvc를 사용하여 API를 요청하도록 수정해야 한다.
public class ReviewControllerTest {
  ...

  @Autowired
  private WebApplicationContext context;

  private MockMvc mvc;

  @Before
  public void setup() {
      mvc = MockMvcBuilders.webAppContextSetup(context)
      .apply(springSecurity())
      .build();
  }

  ...
  public void save_review() throws Exception {
    ...

    // when
    mvc.perform(post(url)
    .contentType(MediaType.APPLICATION_JSON)
    .content(new ObjectMapper().writeValueAsString(requestDto)))
       .andExpect(status().isOk());

    ...
  }

  ...

  public void update_review() throws Exception {
    ...

    // when
    mvc.perform(post(url)
    .contentType(MediaType.APPLICATION_JSON)
    .content(new ObjectMapper().writeValueAsString(requestDto)))
       .andExpect(status().isOk());

    ...
  }
}
@Before: 테스트가 시작되기 전에MockMvcinstance를 생성한다.mvc.performMockMvc를 통해 API를 테스트한다.- Body 영역은 문자열로 표현하기 위해
ObjectMapper를 통해 문자열 JSON으로 변환한다.
@WebMvcTest 에서 component scan 문제 수정
- 현재
HelloControllerTest에서는@WebMvcTest를 사용하고 있다. @WebMvcTest는WebMvcConfigurer,@Controller,@ControllerAdvice를 스캔한다.- 즉,
@Repository,@Service,@Component는 스캔 대상이 아니다. - 따라서
SecurityConfig는 스캔했지만 해당 컴포넌트를 생성하기 위해 필요한CustomOAuth2UserService를 스캔하지 못해 에러가 발생한다.
- 즉,
@WebMvcTest의 스캔 대상에서SecurityConfig를 제거하도록 한다.
HelloControllerTest
Component Scan 필터링
@WebMvcTest(controllers = HelloController.class,
excludeFilters = {
  @ComponentScan.Filter(type = FilterType.ASSIGNABLE_TYPE, classes = SecurityConfig.class)
})
public class HelloControllerTest {
  ...
}
test method에 임의 사용자 추가
@WithMockUser(roles = "USER")
public void return_hello_with_get_request() throws Exception {
  ...
}
@EnableJpaAuditing 분리
@EnableJpaAuditing을 사용하기 위해서는 최소 하나의@Entity클래스가 필요하다.@WebMvcTest는 해당 컴포넌트를 스캔하지 않기 때문에 역시 에러가 발생한다.
@EnableJpaAuditingannotation이@SpringBootApplication과 함께 있다보니@WebMvcTest에서 함께 스캔된다.- 따라서
@EnableJpaAuditing을 분리하여 새로운 config 파일을 생성하도록 한다.
- 따라서
AllReviewApplication 클래스
// @EnableJpaAuditing 삭제
@SpringBootApplication
public class AllReviewApplication {
  ...
}
JpaConfig Configuration 클래스
@Configuration
@EnableJpaAuditing
public class JpaConfig {
}